Thursday, December 31, 2009

cross stitch lockets

Inspired by a conversation over in the Phat Quarter stitchery group on Flickr, I decided to try making cross stitch lockets! I found some small, plain lockets at a local bead store that are about the size of a dime and set to work! I used the smallest aida cloth that I had and adapted some designs to fit (these are SMALL - the total height is 11 stitches, the widest part is 7 stitches) which was a fun challenge.

I found a pattern for a parakeet to use for Kate, plus a "K" monogram that was simple enough to fit in the tiny space. I took a picture next to a penny for comparison.

cross stitch pieces I made for gift lockets

I forgot to take a picture of the completed locket until after I gave it to Kate -- at the end of a very messy dinner (mmm!) and I took pictures on the messy table (the red arrow is pointing to me, next to the word "slob").

cross stitch locket I made for Kate

And Kate immediately added it to the necklace that she was wearing (another parakeet finding that I bought. *cough* I guess I need some new gift ideas).

cross stitch locket I made for Kate


cross stitch locket I made for Kate

I also made a second locket for Bridget (beefranck) that is en route to Beefranck World Headquarters and, of course, I forgot to take a picture of that one completed. Curses! Spoiler: if you look closely at the top picture, you'll see a B and an F which... you know... ahem...

. : * ~ * : . _ . : * ~ * : . _ . : * ~ * : .
Interested in owning a piece like this?
Check out my Etsy shop
or email me for a custom order!
. : * ~ * : . _ . : * ~ * : . _ . : * ~ * : .

Stitch dot painting

I was very excited to receive this commission request from some fine folks over at the MiceChat message boards. It seems some friends on the boards were having a Secret Santa swap and one of the Santas commissioned me to make a gift for their swap partner. I contacted the recipient to ask which character they wanted me to pick and she chose Stitch. I'd never painted Stitch before and I really had fun painting him!

The background color is "raspberry" (the pictures look a little darker, like red) and it looks nice against the light blue background and the contrasting blues on Stitch's body.

I worked from an image selected by the recipient, which displayed Stitch's cute little stubby tail, which really is adorable.

I hope she likes it!

Stitch dot painting - commission


Stitch dot painting - commission


Stitch dot painting - commission
. : * ~ * : . _ . : * ~ * : . _ . : * ~ * : .
Interested in owning a piece like this?
Check out my Etsy shop
or email me for a custom order!
. : * ~ * : . _ . : * ~ * : . _ . : * ~ * : .

Wednesday, December 23, 2009

Merry X-stitchmas everyone!

For our holiday cards this year, I cross stitched Ryan and myself (plus our grey kitty, Ruckus) and a holiday greeting. I meant to make it bigger but didn't pay attention (as per usual) to the size of the weave and ended up choosing the smallest aida cloth they make. The total height of the piece is less than 3 inches. I had originally intended on covering the entire piece with holiday flotsam - candy canes, wreaths, trees, etc. but I was running out of time so there's just the one piece of mistletoe. Oh well!

Happy holidays everyone!

Merry X-Stitchmas everyone!

. : * ~ * : . _ . : * ~ * : . _ . : * ~ * : .
Interested in owning a piece like this?
Check out my Etsy shop
or email me for a custom order!
. : * ~ * : . _ . : * ~ * : . _ . : * ~ * : .

Tuesday, December 22, 2009

Big Ethel dot painting

I received a commission order recently to paint Big Ethel from the Archie Comics as a holiday gift. I've never painted an Archie character before and this was a lot of fun! My customer chose the image and the color scheme and I worked quickly to get it done and sent so that it could get to its intended recipient -- I hope she likes it!

I had to take pictures in my office, under fluorescent lights, so the colors aren't 100% true. The background dots of yellow are actually a light, buttery yellow (but look dark and slightly neon in these pics).

Big Ethel - commission painting


Big Ethel - commission painting


. : * ~ * : . _ . : * ~ * : . _ . : * ~ * : .
Interested in owning a piece like this?
Check out my Etsy shop
or email me for a custom order!
. : * ~ * : . _ . : * ~ * : . _ . : * ~ * : .

Monday, December 21, 2009

Hatbox Ghost embroidery

If you're as big of a fan of Disney's Haunted Mansion as I am, then you're probably already familiar with the Hatbox Ghost. If not, you can read the entire backstory here on wikipedia. In a nutshell: it was an animatronic figure that was developed for the Haunted Mansion but never used. This grim grinning ghost holds a spooky hatbox in his left hand and as riders pass by, his head disappears from his body and into the box. Very cool! Bonus for us Disney geeks: the Hatbox Ghost is supposed to make a grand appearance in 2010! Back to the mansion attic where he belongs!

Mr. Hatbox Ghost (or HBG, as he's sometimes known) is a fan favorite (as witnessed by the auction of a replica figure crafted by Kevin Kidney and Jody Daily - seen below - at the D23 convention where it sold for nearly $10,000!) and he has been lurking for decades and been brought back to life via Twitter!


I love HBG's snarky sense of humor (and indignation!) and have struck up something of a friendship - if you can call electronic exchanges with a corpse a friendship - and so on my vacation, I decided to whip up an embroidery piece of dear old Hattie.


embroidering poolside
Me, stitching by the pool

He stands about 2.5" tall and is embroidered in satin stitch. The white features (face, hands, hatbox) are glow-in-the-dark thread to give him an otherworldly glow.

Once I got home, I sent it off to the Hatbox Ghost himself, care of his dusty old attic.

Hatbox Ghost Embroidery

I haven't decided if I'll make more of these or not, but if I do, they'll be listed in my etsy shop for all you Mansion Fans to find!


. : * ~ * : . _ . : * ~ * : . _ . : * ~ * : .
Interested in owning a piece like this?
Check out my Etsy shop
or email me for a custom order!
. : * ~ * : . _ . : * ~ * : . _ . : * ~ * : .

Tuesday, November 24, 2009

hand-stitched quilt project

Calling all stitchers! If you haven't already, there is still time to submit a piece for Moster8me's hand-stitched quilt project. She's requested that everyone send in a 4x6" fabric piece with your name and city on it -- sort of a stitched postcard quilt. Below is an update posted in September of the pieces she's received so far:


click the image to see the details on who each piece is fromStitch Project as of 9/28/09!

For my piece, I decided to embroider the girlie from my logo onto a purple floral fat quarter piece. I used DMC Light Effects thread for the dress, for a shimmery look, which turned out nifty (even if my photography is kinda poopy). I also didn't use the same font for the "Giddy Girlie" parts mainly because it was a little too challenging to sketch the letters on to the fabric (I don't use iron-on transfers, so I have to pencil in my lines) and instead swapped it for a more open and readable font.


quilt piece for Moster8me's stitchers quilt

The girlie is done in all satin stitch, the Giddy Girlie lettering is in a seed stitch, and the city name is a chain stitch.

quilt piece for Moster8me's stitchers quilt


. : * ~ * : . _ . : * ~ * : . _ . : * ~ * : .
Interested in owning a piece like this?
Check out my Etsy shop
or email me for a custom order!
. : * ~ * : . _ . : * ~ * : . _ . : * ~ * : .

Wonder Woman

At the Long Beach Comic Con, I was fortunate to meet bunch of great people and some of them even took home my art - hooray! One lady made a purchase at the show and inquired about a commission of Wonder Woman, which I thought would be a fun idea. And this is how it turned out:


Wonder Woman commission painting


Closer detail of the face:

Wonder Woman commission painting

For some of the more recent paintings, I've been less of a stickler about the detail dots (like the eyes, lips, etc.) being the same size as the background/fill-in dots, and so I've been able to capture finer details, which I think look a little nicer -- as long as you don't mind the size differences. On this painting, I decide to complete her entire outline in small dots and then fill in with the larger ones (larger, of course, being a relative term - each of these background dots is something like 2-3mm), so that the outline of her hair, shoulders, costume, etc. all match the smaller dot details on the face, which gives it a bit more of a cohesive look (I think? Maybe?).

I also used a few blue streaks to show the highlights and movement in her hair, which don't show up as bright as I'd prefer, but hopefully they work as a subtle suggestion at least (I think? Maybe?).

. : * ~ * : . _ . : * ~ * : . _ . : * ~ * : .
Interested in owning a piece like this?
Check out my Etsy shop
or email me for a custom order!
. : * ~ * : . _ . : * ~ * : . _ . : * ~ * : .

Monday, November 23, 2009

Not bees, beads!

(title courtesy of Arrested Development)


Anyway, this post is, in fact, NOT about bees but instead about beads! Specifically, some of the odd things that I have made from them!

I don't know when or why I had the inspiration, but sometime in the mid 1990's, I started gluing seed beads to things. I made a lot of things and who knows what still exists and what is on a thrift store clearance table by now... I didn't photograph everything back then, but I do have pictures of a few things (even though most are crummy pictures).

I'd usually start with thick watercolor paper, because it warped the least, and trace a light pencil outline of my design and then I'd fill in a tiny section with tacky glue and hand-place seed beads "face up" (what I call it when the hole is facing up) onto the glue, one by one. Tedious? Yes! But it is a lot of fun too.

My former boss collects Alice in Wonderland stuff and she commissioned me to make her an Alice piece, which I did. It's on 8x10 watercolor paper and I have a few progress shots to go with it.

Alice in process


detail of the face, work-in-progress:

Alice's face

Final product:

Alice complete

One of my first "internet crushes" was/is Sara who had a fantastic sewing and crafting site (which is now defunct, but all her creativity can still be found on her new site). She had started a new job at "Saint Flanders Church" as she called it, and needed some holy artwork for her new desk. This was right about the time that Maude Flanders died on the Simpsons, so I beaded up a version of Maude for her.

Maude Flanders

This is a TERRIBLE picture, but I also made some of these beaded trinket boxes for my fellow Tinker Bell collector pals, who were the first ones that drew me to the internet (for which I thank them).

tink-bead-box

I even attempted a beaded tank top. I used my true love, Henry Rollins, as an inspiration. The beading turned out ok, but tacky glue isn't meant for laundering, so I have only worn this shirt once and never washed it. I've recently invested in some glue that is intended for gluing things on cloth, so I'm going to try my hand at something like this again soon.

Henry Rollins tank


detail:

Henry Rollins tank - detail

The one piece that I know remains is a Harley Quinn image that I made in 1999. My mom has it and it's been hanging in her office for the past 10 years. I made this before this whole "internet" thing really came on strong and back in those days when someone had a funny image or joke to send around, they'd blast it via fax machine. My stepdad was remodeling a Kinko's at the time and had to work in the wee hours of the night and he was always amused by the tons of funny drawings that the employees would send one another. This was part of a series of "manga" style comic book characters in risque poses. The others were X-rated, but this Harley Quinn was relavtively "cheesecake." She is nude, except her mask, gloves, and some tall socks. Her breasts are exposed, but they're not as "in your face" in the beaded version. She is covered all over in Batman tattoos, including the Bat Signal, the Batmobile (right butt cheek), and Batman himself (right thigh).

This is also an 8x10 that has been in a frame for 10 years, so it's held up really well. I recently took it out to scan it, but wasn't able to get a high-res scan of it -- although I probably should, just for posterity.

Harley Quinn


detail: My challenge with the 'flesh' colored beads was that the package that I had was a mixed assortment that had some standard seed beads as well as some longer ones and I had to use them both to get enough coverage, so this particular image doesn't have the same solid "top-up" look as some of my other pieces do. I also used to work in poor light (shame!) and I realize now that some of the black beads are actually navy blue - oops! I used to have a giant Tupperware container full of mixed seed beads that someone gave me, so I'd be picking out several of the same color as I went along... which, clearly, lead to a few mistakes along the way.

I've always particularly liked the building with the single beads representing windows. I don't know why that strikes me as "neat-o" but it does.

Harley Quinn detail


Maybe sometime during the 'downtime' of the holidays, I might start a new beading project -- any suggestions?


. : * ~ * : . _ . : * ~ * : . _ . : * ~ * : .
Interested in owning a piece like this?
Check out my Etsy shop
or email me for a custom order!
. : * ~ * : . _ . : * ~ * : . _ . : * ~ * : .

Monday, November 16, 2009

Devo peg people & Mark Mothersbaugh

A while back, I made a set of DEVO peg people just for funsies and they came to the attention of James Sime, who owns Isotope Comics in San Francisco. He liked them, so I sent them up his way and he was very kind about the whole exchange (even offered to trade comics!). So I was even more amazed when I got a message from James recently that he had backstage passes to the DEVO show in SF and he asked if I'd like to pass on a set to DEVO themselves. Um, YES! Of course!

So then I saw this picture on Flickr a few days later -- it's James backstage with Mark Mothersbaugh!! Oh, and Mark is holding my Devo peg people! I nearly fainted from happiness.

According to James:

"He absolutely *loved* them. Clutching them in his hands, his eyes bugging out, exclaiming 'These are SO CUTE!' I told him your website address and he said 'AAAA! PERFECT! EVERYTHING IS SO CUTE!'"

I have died and gone to Devo heaven.


. : * ~ * : . _ . : * ~ * : . _ . : * ~ * : .
Interested in owning a piece like this?
Check out my Etsy shop
or email me for a custom order!
. : * ~ * : . _ . : * ~ * : . _ . : * ~ * : .

Friday, October 30, 2009

Ursula Octopus Costume Tutorial - Part 3

The final part of the tutorial is actually about the make-up. I used children's watercolors to achieve the effect, because my skin won't tolerate grease paints and I didn't want to spend a lot of crazy colors of eyeshadow that I will never wear again.

To use, add just a few drops of water into the color pallette and swirl to create a thick paint, then just brush on. Make a mistake? No problem! Watercolors rinse right off so it's easy to fix -- and easy to remove at the end of the night!

For the hair, I used a blonde "rocker" wig that I found on clearance. I couldn't find white hair and didn't have time to spray paint this white, but I think the light blonde kind of works. This particular wig had long pieces (sort of mullet-ish) in the back which I pinned up to give more volume to the back of the hair, although by the time we got to these pictures, the bobby pins were losing their grip!

inside Ursula's Grotto

The skirt under the tentacles covered by legs and also created a "water" effect, as if the octopus is swimming along.
inside Ursula's Grotto

I found some false eyelashes at Wal-Mart for $3 that had fantastic little sparkles on them and purple lashes. They added a little pizzazz to my eyes.
sparkly eyelashes

Here is my original make-up test: I opted to use the thinner eyebrow and the bolder paint color (to soften the color, add water and dilute).
make-up test for Halloween

Thursday, October 29, 2009

Haunted Mansion Haunt

Hey all you Halloweenies! If you're as big of a fan of the Haunted Mansion as I am, you won't want to miss this! There is a home in Orange County (Portola Hills) that puts together a walk-through haunted house based on the Haunted Mansion at Disneyland!

Check out their website for the details (including a night vision video from last year!). It looks SPOOKtacular and is open Friday, Oct. 30, Saturday, Oct. 31, and Sunday, Nov. 1 from 6-10pm.

I'm planning a trip for Sunday and will report back all the grim grinning details!

Monday, October 26, 2009

hitchhiking ghosts jack o lantern!

The hitchhiking ghosts are, clearly, some of my favorite Disney characters of all-time. And since I've had everything HHG on the brain lately, it was an obvious choice to use them for my jack-o-lantern as well!

I had intended to do 3 basic light sources: the outlines, the cut outs, and the scrape-offs (I'm sure there is a proper term for that, but I don't know it), but the rind on this pumpkin did NOT want to scrape off, so I ended up doing more cutting than originally planned. I was able to scrape out Phineas's doctor bag, but the rest of the rind was not giving up the ghost, as it were.

I think the simplified pattern works okay and I may even try it again one night this week (if I can find the time!).

hitchhiking ghosts jack-o-lantern

hitchhiking ghosts jack-o-lantern

hitchhiking ghosts jack-o-lantern

Scooby Doo stop-motion

My friends and I dressed as the "Scooby Crew" last year for Halloween and it was so much fun that I keep crafting up Scooby Doo themed gifts for them (which, I know needs to stop). My latest creation was a set of peg people that went to my friend Kate.

For those of you who don't know Kate - she's not the kind of person who will just casually place something on a shelf and forget about it. Oh no. This is what she did with her present: created a stop-motion video of the Scooby Doo intro!!


After you've recovered from the giggle fit that is sure to ensue, you should check out some of the other work that the talented and lovely Kate has done. Ever wonder what happens in the life of a sock zombie? Well, wonder no more!!


. : * ~ * : . _ . : * ~ * : . _ . : * ~ * : .
Interested in owning a piece like this?
Check out my Etsy shop
or email me for a custom order!
. : * ~ * : . _ . : * ~ * : . _ . : * ~ * : .

Tuesday, October 20, 2009

Ursula Octopus Costume Tutorial - Part 2


First, the skirt. I searched high and low to find a skirt or fabric from a thrift store to use for the skirt piece, but couldn't find anything that would work. I wanted the skirt to simulate the ocean beneath the body (so that the octopus appears to be floating or swimming) and to hide my legs. Since I couldn't find anything second-hand that fit the bill, I ended up having to buy fabric and sew this myself.

I searched through the remnants section of my local fabric store and came across this black and blue sheer fabric that has a vaguely "tie dye" kind of pattern to it that also made me think of water/waves. Since it was an end-of-the-bolt piece and a remnant, it was only a few dollars. But the fabric was too sheer and dark to show up properly, so I bought a piece of lavender fabric to place underneath. It really helps highlight the print on the sheer fabric. This fabric was something like $2 a yard, so all told with the thread, elastic, etc. I spent something around $8 for the skirt piece.

I just sewed a simple skirt out of 2 yards of fabric, so that it would be extra wide. Once the elastic was put in place, the top of the skirt bunched and gathered together -- which is what I wanted, so that it pushes out and lays in an A frame shape. Once the lavender skirt was sewn, I attached the sheer fabric to the top.


Ursula skirt - finished

Close-up of the fabric pattern:

Ursula skirt - close-up

On to the accessories! Ursula has earrings that are made from some sort of purple auger shells and a large sea snail necklace charm. I decided to make these myself, rather than purchase real shells. I used Crayola Model Magic clay to sculpt them. This gave me the benefit of them being lightweight and durable. Since I'll be wearing this costume for a Disneyland Halloween party, I'll be bumped into and upside down on rollercoasters... it's better to be bonked in the face with 1 oz of foamy clay than 1 lb of actual shell!

Ursula earrings

After they dried, I gave them a quick coat of paint and then hot glued a black ribbon to the necklace charm.

Ursula necklace and earrings

All that's left is to customize the wig that I bought!

Monday, October 19, 2009

Once upon a time, I had a crafty sister in arms named Amy Choppa. She was one of my first internet crafting pals and we'd send packages back and forth via "Choppa Mail" which was actually ziplock bags and tupperware containers taped closed (but see-through, so the mailmen/mailwomen handling them could get a smile). It was great!

And then not so long ago, Ms. Choppa got married and became Mrs. DoubleYou and soon she's going to be Mommy DoubleYou! I am, needless to say, very excited for her (and Mr. DoubleYou too!).

After trying my hand at painting the Giggly Family, I decided to paint the DoubleYou family! Baby DoubleYou hasn't actually made his entrance, er, exit (as it were) so I cannot say that he will be born with a single curl of hair on his head. I can, however, confirm that he will have a onesie with muscles painted on it! I thought this was utterly hilarious, so I painted Baby DoubleYou with it on.

I also included the DoubleYou dogs, Ruby & Clementine, who are Boston Terriers. This was my first time ever painting animals as peg people and I am pretty happy with them. I tried to mimic the dogs' coloring and patterns, but as always with peg people, they're not exact! :)


Matt, Amy, & Family


. : * ~ * : . _ . : * ~ * : . _ . : * ~ * : .
Interested in owning a piece like this?
Check out my Etsy shop
or email me for a custom order!
. : * ~ * : . _ . : * ~ * : . _ . : * ~ * : .

Saturday, October 17, 2009

Ursula Octopus Costume Tutorial - Part 1

Recently, I blogged about my Halloween costume that I was planning to make, which is Ursula the sea witch from the Little Mermaid movie. I came up with this idea one day and I just sort of made it up as I went along, so it's not exactly perfect, but I think it's a decent design and could be used for just about any tentacled creature you'd ever want to make!

I purchased all of the pieces for this costume at a thrift store (purchased all in a single trip, actually) and spent about $5. This doesn't account for glue or thread or fiber fill, since I had those things already. But if you threw those in the mix, you'd be investing another $5 or so.

The costume is INCOMPLETE as of right now (I'll explain later) but this is what I have so far, which is the majority of it. Also, please note that I am not working toward an exact reproduction of the character. I have taken certain liberties (which I will point out along the way) with the design that I don't think affect the outcome.
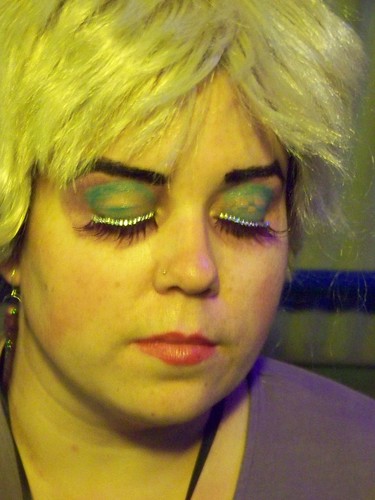
Inspiration:


Materials:
* purple shirt with long sleeves (mine is actually 3/4 sleeves, but close enough)
* black velour dress - this is a plus-sized, full length dress
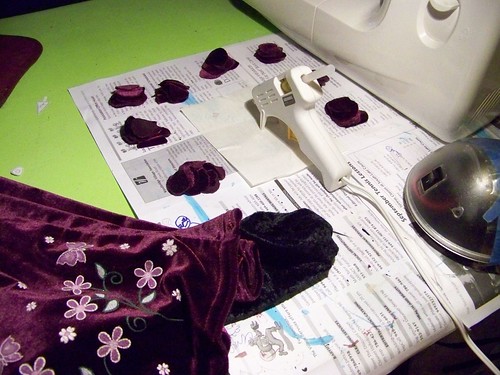
* purple velour dress - this is a child's sized dress


The black dress that I found was stretchy and has a textured pattern to the fabric that I like. It looks more 'aquatic' to me. The neck hole actually fit comfortably around my bust, so I didn't need to do any alterations for the top to fit.

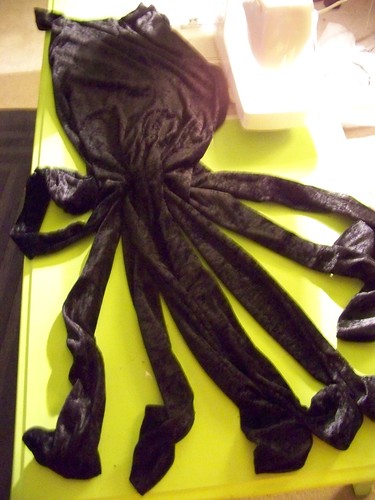
First, I cut the 'tentacles' about halfway up the dress.


100_6381

100_6387

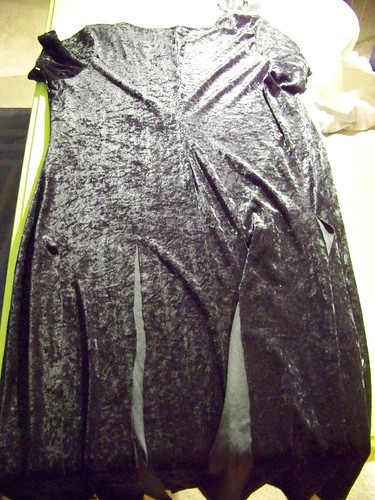
I had decided from the start not to replicate the purple undersides of Ursula's tentacles. I decided to simplify (shown below), so the tentacles are just black all the way around.

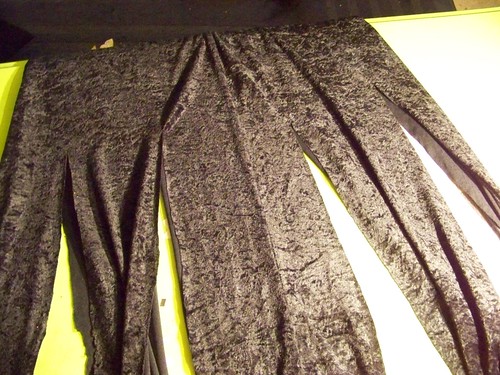
Then I sewed the tentacles closed (basically like a tube) and when they were all sewn, the material had become tighter at the bottom (shown below) because the dress was, essentially, halved. Since I need to fit my body through here, I made small cuts in the fabric on the 'body' section in between the tentacles. This material is great for that, because it doesn't fray so I didn't need to do any hemming at all, I just cut and tore it until it was an adequate space for me to fit through. I then turned the body inside out and removed the sleeves and sewed up the place where the sleeves once were. This fabric is also great for hiding uneven edges, I've found! And since the sleeve holes would be in my armpits, I didn't do a great job in sewing them, I'll admit.

100_6392

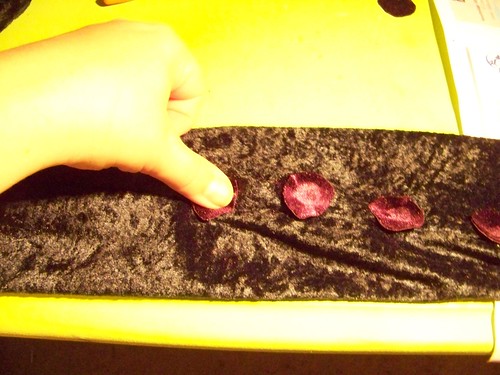
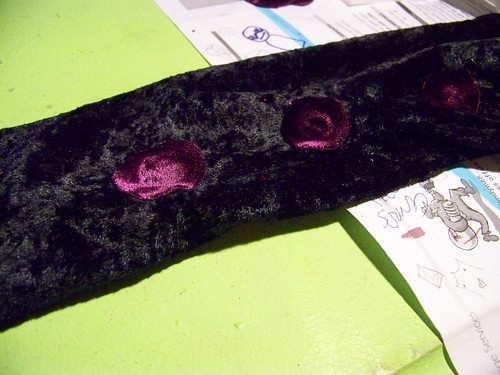
After the body was sewn, I attached the suckers to the tentacles. I cut circles from the purple velour child's dress and attached them with hot glue.

100_6398

Before starting, I put a strip of cardboard covered in box tape inside the tentacle fabric, so that the two sides didn't get glued together. The box tape made a slick surface, so that the glue never had a chance to adhere (if I'd used just cardboard, the glue might have stuck a little to it).

I then put down a blob of glue and pressed the circle into it, using my thumb. YES, THIS IS VERY HOT. I would sometimes set it in place with my thumb and then use a marker (I had a Sharpie nearby) to push it down the rest of the way.

100_6407

100_6405

When the suckers were attached, I stuffed the tentacles with fiber fill. I then attached the 'body' to the purple shirt, for ease of wear. I also used hot glue for this attachment, instead of taking the time (and energy!) to sew them together.

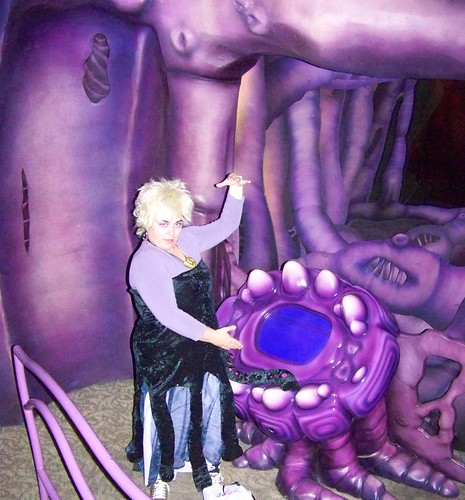
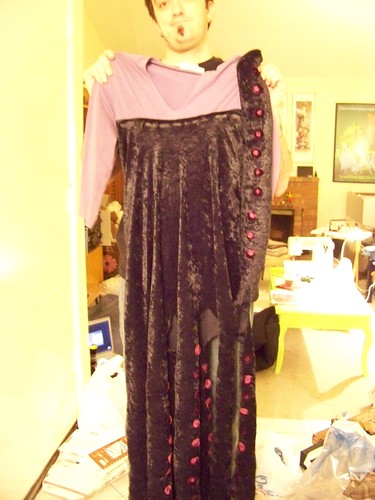
The final product is being held up by my husband, who is also holding up one of the tentacles so you can see the suckers.

100_6411


And another shot with the 'body' stretched out, so you can see how the tentacles will hang when worn.

100_6413

I'm debating whether or not I will fill in the space between the shirt and the 'body' with fiberfill. Ursula is a full-figured octopus, but it may be too hot for wearing all night (the past couple of Halloweens have been scorchers), so I may just let my natural figure fill it up. :)

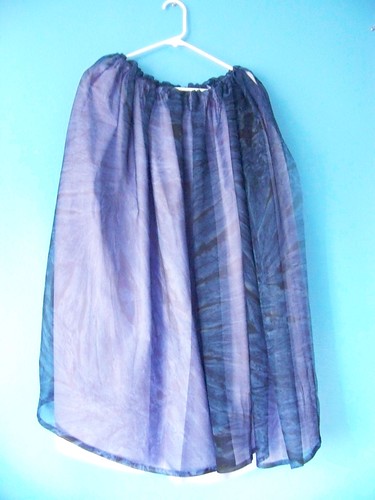
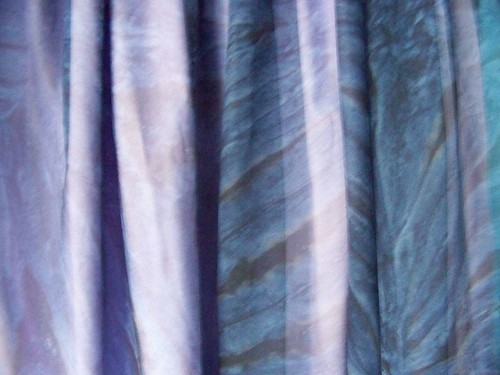
This is only the top 1/2 of the costume, because I don't want my legs to show at all, plus I want the tentacles to be easily seen, so I am constructing a skirt to go underneath that will represent the water in the ocean and possibly have some fish in it... stay tuned!

Thursday, October 15, 2009

Giggly Mama Family

Giggly Mama is not just giggly -- she's part of my family! And her birthday was coming up, so I thought I'd make her a set of peg people -- but who to make? And then I saw her pictures of the family picking pumpkins and I had an 'aha' moment: I'd paint the family!

This was my first-ever attempt at painting people that I know, so it was a little nerve-wracking! It's one thing to paint cartoon characters, who are not real people who might look at something and think "why did you give me such wide eyes? Do you think I am a shark? Am I supposed to be smiling or smirking? And are you saying my shoes are ugly?" See? It makes you nervous!

Fortunately, Shannon is an artist and crafter herself and can appreciate the thought and the gesture and doesn't get bent out of shape if her eyes are painted uneven! :)

So happy birthday Shannon! I hope you have a great day and enjoy your new peg people!


. : * ~ * : . _ . : * ~ * : . _ . : * ~ * : .
Interested in owning a piece like this?
Check out my Etsy shop
or email me for a custom order!
. : * ~ * : . _ . : * ~ * : . _ . : * ~ * : .

LinkWithin